Pea & strawberry salad with tarragon vinaigrette

This pea & strawberry salad with tarragon vinaigrette is brightly coloured, filled with summer goodness and utterly delicious. I’m having it on repeat and I hope you will too!

pea salad-0137.jpg

Though I love salads year round, during late spring and throughout summer especially, I become almost obsessed with them. It may be the heat, or the longer days, but I think it’s mostly the abundance of brightly coloured, juicy and soft produce available. All berries, watermelon and grapes too make a frequent appearance and most often take centre stage.

pea salad-0122.jpg

Most salads I make don’t follow an exact recipe, but rather rely on layers of ingredients and flavours. I usually start with fresh greens (crunchy gem lettuce, watercress, rocket or baby spinach) and herbs too, which oftentimes I don’t even bother chopping; when added whole they also work as leaves, instantly adding so much flavour; then there’s fruit, whole or halved or quartered, a handful of them squeezed between my fingers, gifting their precious juices to a simple vinaigrette. Aim for 4 parts extra virgin olive and one or two parts acid (lemon or lime, or both, cider or balsamic vinegar, red or white), maybe a little mustard, some grated garlic and a generous pinch of sea salt and freshly ground pepper too and you’re golden - though I often add fresh herbs here also.

So I did in this pea and strawberry coupling: fresh tarragon (which I find inexplicably underused - it’s so subtle and powerful all at once, making for an almost intoxicating addition to anything), finely chopped and tossed with extra virgin olive oil, lots of it, as I think peas need it, a little white balsamic and lime too (both juice and zest) as we’ll need the extra acidity to balance out the sweetness of the strawberries and buttery peas, a drizzle of maple syrup and sea salt flakes too. The best and easiest way to bring everything together is a jar: shake it vigorously and set aside until right before serving the salad. While the latter is best served cold, the vinaigrette should be at room temperature.

You can add lots more here (cherry tomatoes, green beans, feta crumbles or grated parmesan, nigella seeds or toasted almond flakes), but I rather prefer it just so: the pinkish red and the bright green, dotted only by the golden drizzle. Beautiful and, most importantly, beautifully simple.

pea salad-0134.jpg

Pea & strawberry salad with tarragon vinaigrette

WHAT

300g strawberries, halved or not depending on their size

400g frozen peas

for the vinaigrette:

200ml extra virgin olive oil

1 tbsp white balsamic

1 lime, juice and zest

1 tsp maple

1-1/2 tsp sea salt flakes

HOW

  1. Put all the vinaigrette ingredients in a jar and shake to combine; set aside.

  2. Blanch the peas (first put in a pot of boiling water for 2’, drain in a colander, then run under very cold water; drain again and tip in a serving plate.

  3. Add the strawberries and then drizzle with the vinaigrette; toss gently to coat and serve.

Coffee cake with cinnamon & dark chocolate ganache

Soft and lightly sweet, this coffee cake with cinnamon & dark chocolate ganache is discreetly fragrant and perfect when paired with more coffee. 

espresso cake-.jpg

One of the greatest pleasures of my day- in fact, the very first of them all- is coffee. Black and mildly strong, sipped slowly while I gaze out the window or read the news. The house and streets outside are quiet, usually dark and I have them all to myself. This serenity and that delicious first cup of coffee are sheer pleasure, a gift which, though daily, I dare not take for granted.

espresso cake--4.jpg

I grew up in a coffee-adoring family. My parents love Greek coffee and they’re quite serious about it: they’ve come up with their own blend (65% Greek coffee, 35% espresso), which they buy regularly from their coffee guy, and most coffees of they day (I think each has about three or four) they drink in the same way: together, is small cups, unsweetened. It is a ritual they both very much love, one that I think inadvertently has been passed on to my sister and me. We both love coffee.

coffee cake-.jpg

I rarely use it when I bake though; I believe this is because I am so fond of its flavour and smell, I prefer not to have it combined with any other. Still, it really is a treat when used in desserts, adding a warm depth and a richness few ingredients do. For this loaf, I used mildly strong espresso, diluted in almond milk for a flavour which comes through just enough to make you go for yet another slice. The finishing touch, a simple chocolate ganache, is silky, a little decadent and very fragrant. Ever since I made it, I realised how much I like pairing dark chocolate with cinnamon- here they are beautifully combined and in perfect company with this light coffee cake- which of course is even better served with coffee.

coffee cake-6550.jpg

Espresso loaf with cinnamon dark chocolate ganache

WHAT

130g all purpose flour

2 teaspoons baking powder

a pinch of salt

1 tablespoon ground espresso coffee 

125ml almond milk

150g demerara sugar

150g unsalted butter, very soft

3 medium eggs

for the ganache:

125g single cream

150g dark chocolate, roughly chopped

1 teaspoon ground cinnamon

HOW

  1. Preheat the oven to 180ºC (160ºC FAN) and lightly butter a cake pan; set aside.

  2. Combine the flour, baking powder and salt and set aside. Combine the milk and ground coffee and warm over medium/low heat for about 5′ (do not boil). Remove from the heat and set aside to cool.

  3. Beat the butter and sugar until pale; add the eggs one at a time and beat well to combine; add the coffee/milk mixture and combine.

  4. Add the dry ingredients and fold with a spatula to incorporate.

  5. Pour in the pan and bake for 35-40′, or until an inserted skewer comes out clean.

  6. Allow to cool in the pan for 5′ and then place on a wire rack to cool completely.

  7. To make the ganache: place the chopped chocolate in a medium-sized bowl. Pour the cream into a small saucepan and warm over medium heat until just before boiling point. Remove from the heat and pour over the chopped chocolate; wait for 1’ and then stir gently, melting the chocolate into a glossy mixture.

  8. Pour over the cooled cake, allowing it to drip down the sides and smoothing with a palette knife if necessary.


Linguini with sardines, capers, sultanas & breadcrumbs

My new favourite pasta dish: these linguini with sardines, capers, sultanas & breadcrumbs are filled with so much flavour and it’s a pure joy both to make and eat it- on repeat!

SardinePasta-9867.jpg

To me pasta is so much more than comfort food: I often see it as a blank canvas, upon which I can play almost endlessly. I make up recipes sometimes, using seasonal favourites or experimenting with fresh and jarred or tinned ingredients alike; more often than not though, a dish comes together from bits and bobs left in the fridge or the cupboard, some still keeping their looks and others slowly fading away- they’re all fair play for a good pasta dish. This one, came together exactly like that.

SardinePasta-9857.jpg

A tin of sardines (a constant staple in our kitchen), a bunch of capers swimming reluctantly at the bottom of a briny jar, a handful of sultanas picked from a box of store-bought muesli, lots of lemon and parsley (a favourite combination) and, right before serving, a big sprinkle of another staple: breadcrumbs and roughly chopped walnuts, toasted with a drizzle of extra virgin olive oil, a pinch of dried oregano and another of sea salt flakes (I make lots of this and keep it forever in a jar on my kitchen counter, often adding to it with leftover breadcrumbs and sesame seeds from our meals).

SardinePasta-9868.jpg

Linguini is perfect here, delicate, yet with a lovely bite, allowing all these lovely leftovers to gently dance around it, lightly clinging to it in every forkful; everything I love in a meal is here: saltiness from the fish and capers, sweetness from the lovely, plump fruit, a touch of acidity and freshness gifted by much needed squeeze of lemon and a delicious, fragrant crunch. Add a last drizzle of olive oil and enjoy alongside some crisp white wine.

SardinePasta-9870.jpg
SardinePasta-9872.jpg

Linguine with sardines, capers, sultanas & breadcrumbs

WHAT

1 tsp olive oil

100g stale wholemeal bread, torn into big chunks

50g walnuts, thinly chopped

big pinch of salt

1 tsp dried oregano

100g sultanas & raisins combined

3 tbs capers, well rinsed

juice from 2 oranges

2 tbsp olive oil

1 large red onions, sliced

4 garlic cloves, sliced thinly

1 can of sardines in extra virgin olive oil

400g linguine

To serve: lemon wedges & a good drizzle of extra virgin olive oil


HOW

  1. Put the bread in a food processor and pulse to coarse breadcrumbs (some bigger pieces are fine).

  2. Soak the sultanas, raisins and capers in the orange juice, setting them aside while you carry on.

  3. Heat a large frying pan over medium heat and add one teaspoon olive oil; tip in the breadcrumbs, walnuts, oregano and salt. Toss well to combine and cook for 8-10’ or until golden and crunchy. Tip into a bowl and set aside.

  4. In the same pan, add two tablespoons olive oil and then the onion and cook for about 5’, until softened. Add the sliced garlic, cook for another 2’ and then add the orange juice with the fruit and capers. Increase the heat to high and cook for about 3’, stirring quickly. Set aside.

  5. Cook the linguine in plenty of salted water until al dente, reserving about half a cup of their water. Drain and immediately add to the frying pan.

  6. Toss well, so that the orange juice and onion sauce coats everything well (you may need to add some of the pasta water) and immediately plate.

  7. On each plate, add a couple sardine fillets, a lemon wedge, a big handful of the breadcrumbs and nuts and finally a good drizzle of extra virgin olive oil.


Rustic apple galette with blueberry jam

This rustic apple galette with blueberry jam is the perfect treat for cold early mornings and cosy evenings as well- enjoy with a big dollop of cream or thick yogurt.

galette-7.jpg

Every time I crave a pie but I’m feeling a bit lazy, I make a galette. All you need is an as-easy-as-it-gets dough resting in the fridge for a little while and then, as far as the filling is concerned, the sky is the limit. For savoury ones, I love using all sorts of vegetables, cut in small pieces, tossed with fresh herbs and often cheese, which melts to irresistible perfection. I can think of very few things more appetising both for a swift lunch and a centrepiece for when hosting lots of people.

As for the sweet ones, like the one here, all you need is seasonal fruit (firm sweet apples and juice pears in the winter, all sorts of berries in the spring and a variety of stone fruit in the summer), a touch of spice, a drizzle of alcohol and a dollop of jam to sweeten things up.

galette-2.jpg

This unassuming beauty is perfect for winter and autumn alike. Use any kind of apple you like and have in hand (you can throw some pears in there too if you have them), add some lemon juice for a lovely touch of acid and balance it out with a couple spoonfuls of sweet blueberry jam.

Child’s play to make (in fact, I always double the dough recipe and keep some in the freezer almost at all times) and lovely for when you want both a little treat and to use up any bits and bobs lingering in the fridge.

galette-6.jpg
galette-3.jpg

Rustic apple galette with blueberry jam

WHAT

For the dough:

300g plain flour

1 teaspoon salt

1 tablespoon caster sugar 

225g very cold unsalted butter, cubed

1 teaspoon pure vanilla extract

4 tablespoon cold yogurt

4 tablespoon cold water

For the filling: 

350g apples, cored & sliced

3 tablespoons light brown sugar

2 tablespoons cornflour

1 teaspoon cinnamon

a pinch of salt

juice from 1 lemon

3 tablespoon jam (I used blueberry)- if too thick, loosen with a splash of water

1 egg & 1 tablespoon water

caster sugar to sprinkle

HOW

1. Combine the flour, salt & sugar; add the butter and mix with your fingers to form large rough breadcrumbs; add the vanilla extract, yogurt & water and fold with a knife to combine

2. Shape into a smooth ball (you may need to add a pinch of extra flour), half, flatten into disks and put one in the fridge and one in the freezer (keeps for up to two months)

3. Preheat the oven to 190C (170C FAN); add sugar, flour, cinnamon, salt & lemon juice to apple slices and toss well with your hands; set aside.

4. Take the pastry out of the fridge and roll out (between two sheets of parchment paper) to a circle (about 30cm diameter) and spread the jam on the dough using the back of a spoon. Add the apple slices & juices and arrange evenly, leaving a small margin all around. Fold the dough to cover just the edges of the filling and brush with the egg wash & sprinkle with some sugar

5. Bake in the preheated oven for about 30’, or until the pastry is puffed & golden and the filling bubbly.

6. Slice and serve with yogurt, cream or ice cream 

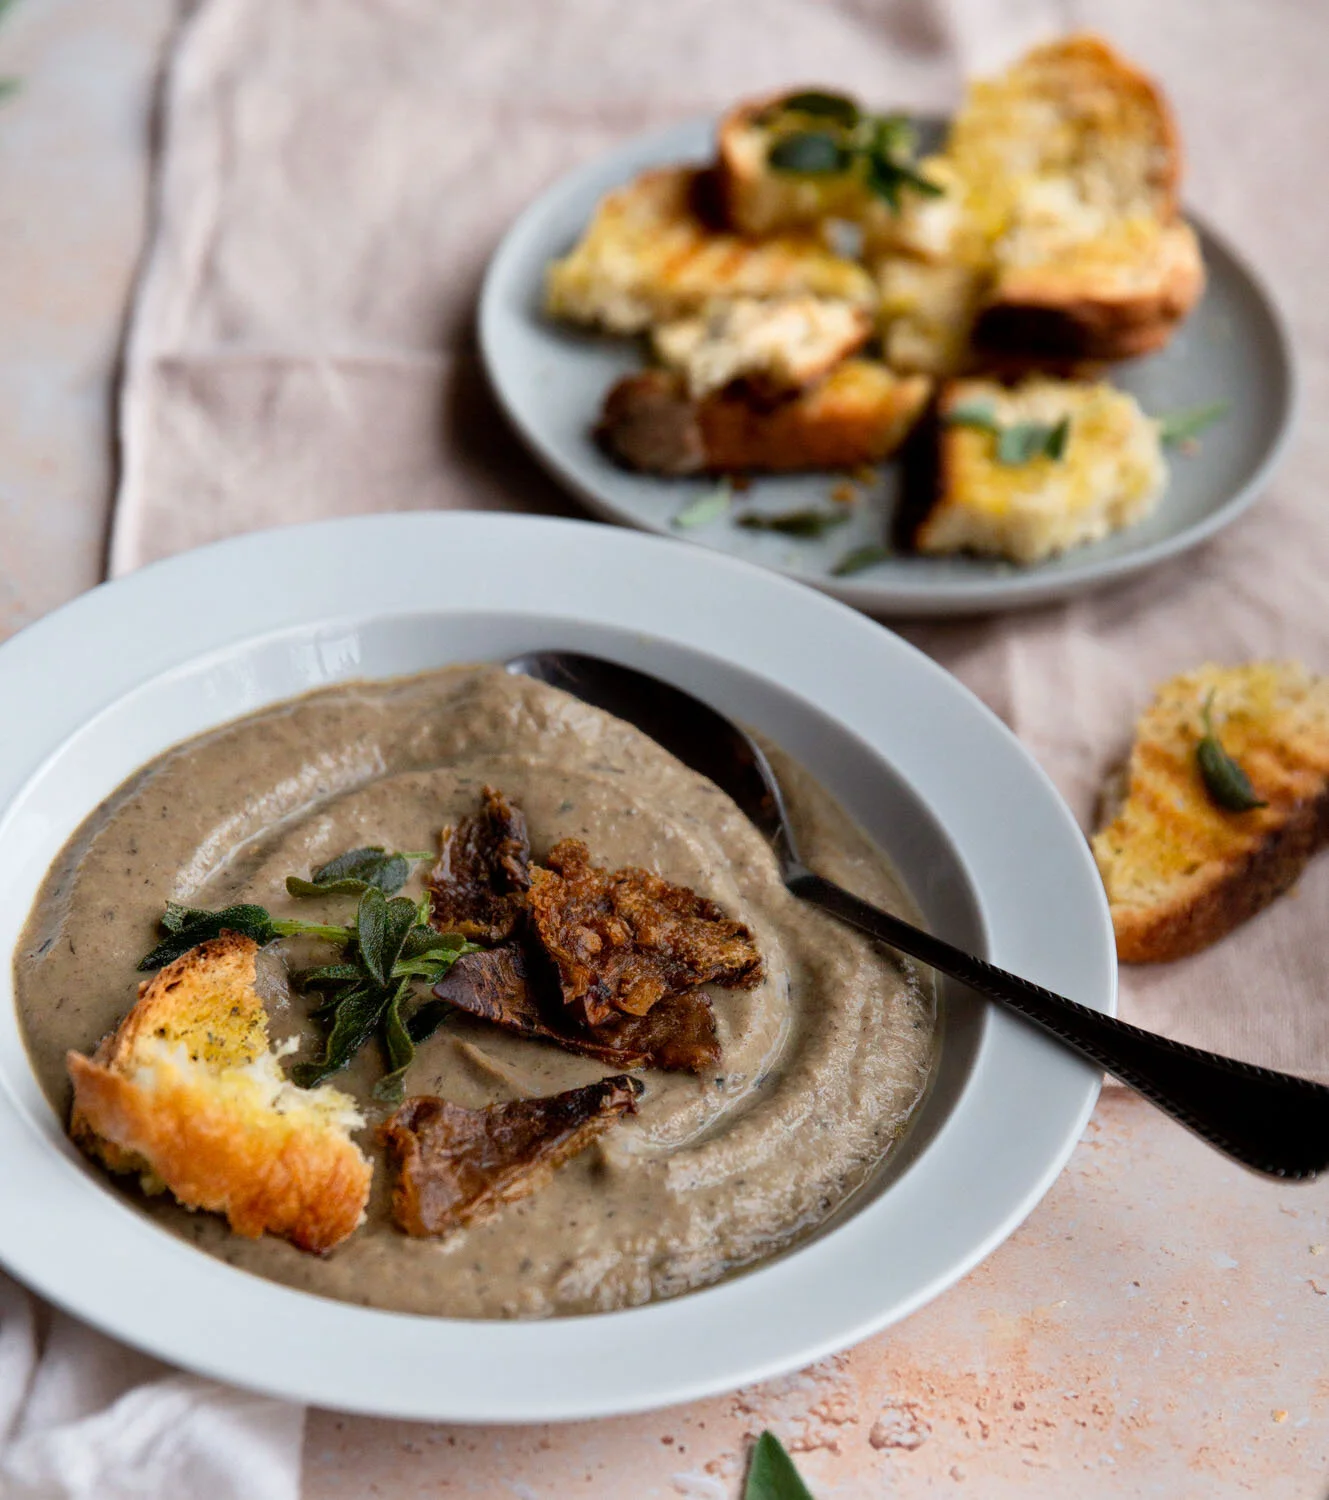
Wild mushroom soup with crispy sage & crunchy sourdough

November truly is the best time for this wild mushroom soup with crispy sage & crunchy sourdough - it’s the perfect heart and body warming comfort food for these late autumn days.

mushroom_soup

I don’t cook mushrooms all that often- I’m not sure why, as I find both their flavour and appearance (and variety they come in) very intriguing. In any case, this has recently changed. I’ve been in Athens for the last few months and, along with my everyday view, the light and pace, my cooking seems to also have somehow changed. As I’ve been heavily relying on the nearby little shops and weekly farmer’s market, I’ve found ingredients I have so far only used sporadically and almost exclusively when I’m on holiday, along with others, entirely new to me. 

mushroom_soup

Apart from old favourites (local apples, juicy and slightly hard skinned, sweet though and with the most beautiful crimson colour, or an abundance of green, light brown or almost black olives), I’ve also been charmed by an assortment of these new discoveries: from thick jams and soft sesame, nut and honey bars, to an almost scandalous variety of cheeses and lightly spiced charcuteries from every part of the country, spoon desserts, tahini halva and soft must cookies. And then of course there’s dried mushrooms, carefully harvested from the North and sold in neat little packages. I’ve truly fallen in love with these.

Softened in hot water and sliced thinly, they make absolutely everything sing: I’ve added them, alongside fresh dill and a thick layer of goat butter, on large pieces of toast; they’ve flavoured a thick bolognese and their dark water has hosted local wide and thick egg noodles and broccoli florets. And then of course there’s this soup.

mushroom_soup
mushroom_soup

Though I really didn’t cook much with mushroom until recently, what a joy it’s been to get to this dish; what a joy it’s been to find new ingredients to excite you, new textures to feel, new flavours to add to old loved ones. And what a treat, to enter the kitchen with renewed curiosity and a slight anticipation of adventure. These mushroom soup had been a sort of gift, though there truly couldn’t be a more humble start to it: onions, garlic, leeks (for sweetness) and potatoes (for thickness), plain white mushrooms and the softened wild ones, their delicious water, some white wine and stock. Salt and pepper and some almond milk, just before serving. It’s delicious like so and you could stop there; but you really shouldn’t.

mushroom_soup

Toast thick slices of sourdough and while still hot, tear them into large chunks and top generously with olive oil, sea salt flakes and coarsely ground black pepper. Lastly, fresh sage - which I find criminally underrated; it is such a joy to cook with, it’s intoxicating scent can truly make any dish sing, from pulses to all kinds of meat and buttered pasta. So, fry a small handful of leaves in hot olive oil (keep this for later, it will do wanders drizzled on to fried eggs or a chunky kale salad) and finish off this wonderfully simple, essential wintery and beautiful warming soup with these, the torn sourdough and few of the lovely wild mushrooms, the ones that thankfully got us here in the first place. What a joy! 

mushroom_soup

Wild mushroom soup with crispy sage & crunchy sourdough

WHAT

3 tablespoons olive oil

2 leeks, sliced

1 large white onion, roughly chopped

6 garlic cloves, thinly sliced

2 medium potatoes, peeled and cubed

500g crimino mushrooms, thinly sliced

15 g dried wild mushrooms (I used a combination of black and white ones), soaked in 1/2 cup hot water for 30’

Salt and freshly ground pepper, to taste

1/2 cup dry white wine

1 cup vegetable stock

For the crispy sage: 

2 tablespoons olive oil

A small bunch of sage

For the sourdough:

3-4 sourdough slices

Extra virgin olive oil

Sea salt flakes & coarsely ground black pepper

HOW

  1. Warm the olive oil in a large pot over medium/ low heat and cook the leeks and onion until soft, about 10’. Add the garlic and potatoes and cook for another 2-3’.

  2. Add the fresh and most of the dried mushrooms (hold their water for now and keep some for serving), increase the heat to medium/high and cook undisturbed and covered for about 10’. Remove the lid, add the wine and cook for 5’.

  3. Lower the heat to medium/low and add the mushroom water (pass it through a very fine sieve first), stock and a big pinch of salt and simmer for about 20’.

  4. Turn off the heat and puree using a hand blender to your liking (I like it slightly chunky, not perfectly velvety); return to the pot and add almond milk to your liking (depending on how thick you want the soup, I usually add about 1/4 cup). Taste and adjust the salt if needed, grind some black pepper and keep warm over very low heat (don’t let it boil), while you prepare the crispy sage and sourdough chunks.

  5. Toast the sourdough slices in a toaster or sandwich maker until browned. Remove and torn into sizeable chunks. Drizzle generously with extra virgin olive oil and sprinkle sea salt flakes and finally a few good grinds of black pepper.

  6. In a small sauce pan, warm the 2 tablespoons olive oil over high heat; add the sage and fry for about 2-3, or until sizzling (careful not to brown the leaves). Remove the sage from the pan and place on a kitchen paper until ready to serve.

  7. Ladle the soup into bowls, top with the remaining mushrooms, crispy sage, a drizzle of the sage oil and sourdough chunks.


Apple, dried fruit & hazelnut loaf

Soft and delicately spiced, this apple, dried fruit & hazelnut loaf is light enough to have for breakfast, but is also in perfect company with an afternoon coffee or tea.

apple_loaf

I don’t have a strong sweet tooth and nine times out of ten, when craving something sweet, I am more than happy with a juicy or crisp fruit, some nuts mixed with honey or a handful of dried fruit. Cheese and crackers seem to be my vice - though to be fair, I can never resist syrupy desserts like baklava, kataifi or galaktoboureko, most of which hail from Turkey but have long been a much loved part of Greek cooking as well.

apple_cake

There is something however about fall and winter, especially fall, that makes me crave baking - the act possibly more than the outcome it will yield. A warm kitchen, a work surface covered with seasonal fruit and spices, maybe some dark chocolate too, a cup of coffee within arm’s reach - all that are music to my ears, which I seem to follow time and time again once the weather cools off and the days are shorter.

apple_loaf

This loaf is everything I love about seasonal baking; there’s cinnamon and cloves (often overlooked, but to me they encapsulate autumnal bliss and the promise of the holidays to come), orange zest and a crisp apple; there’s a simple batter made of vegetable oil, for a lighter, fluffier loaf, a little sugar and a little petimezi (grape molasses, which I love cooking with), which gives the pudding it’s warm colour and a caramel like taste. And then, best of all, there’s dried fruit (Greek sultanas and raisins, delicious whichever way you have them) and toasted hazelnuts, used almost whole, because I love biting into something crunchy, every time.

apple_cake-0006-2.jpg

A little stirring, time in the oven and out it comes, gloriously humble and possibly even better when dusted with some icing sugar and served with a generous drizzle of slightly warm honey.

Apple, dried fruit & hazelnut loaf

WHAT

3 medium eggs

75g caster sugar

75g petimezi (grape molasses)

120ml vegetable oil

1 large sweet apple, grated

80g dried fruit (I used sultanas & raisins)

Zest from 1 large orange

1 heaped teaspoon cinnamon

1/2 teaspoon ground cloves

160g all purspose flour

50g unsalted hazelnuts, toasted & halved (or roughly chopped)

HOW

  • To serve (all optional): icing sugar, honey, Greek yogurt or cream

  • Preheat the oven to 180C (160C FAN); lightly grease a 900g loaf tin and line the bottom with parchment paper.

  • Using a hand-held mixer, beat the eggs, sugar and petimezi, until frothy. Add the vegetable oil and beat again.

  • Tip in the grated apple (try to drain most of its juice), the dried fruit, zest and spices and beat once again.

  • Finally, add the flour and hazelnuts and fold gently with a spatula to incorporate.

  • Pour into the loaf pan and bake in the preheated oven for about 45’ or until an inserted skewer comes out clean (if the top begins to brown too quickly, loosely cover with some foil).

  • Let cool slightly, dust with some icing sugar (if wanted) and serve with some honey and Greek yogurt or cream.

Kale, apple & spicy seed autumn salad

Packed with flavour and seasonal goodness, this kale, apple & spicy seed autumn salad is an ode to fall colours and a celebration of bitter greens, sweet apples and spicy crunchiness.

kale_apple_salad

As the seasons change, along with the different colours in the sky and the leaves, so does my appetite and cooking change. Quick pasta dishes, barely cooked and devoured with lots of fresh cheese, speedy omelettes and summer vegetables roasted with lots of herbs - all these obediently and gracefully give way to heartier food, darker colours and different textures. As I’ve bod farewell to juicy tomatoes, crisp cucumbers and soft sweet stone fruits, I’m falling all over again in love with dark green leaves, crispy cabbages and sweet carrots; I crave soups and stews and thick pasta sauced, cooked slowly over low heat, along with spices and fragrant herbs. I can’t get enough of tart and sweet apples and pears and hot oats served with warming cinnamon and toasted nuts.

kale_apple_salad

Our salads too change, in colour and in texture. This this kale, apple & spicy seed autumn salad is adorned with lots of autumnal jewels: seeds and pine nut kernels and minuscule but fierce shallots, all tossed with sweet Cretan honey, golden olive oil, a pinch of chilli flakes and another of Greek sea salt flakes. Baked until crispy and oozing sweet heat, they’re ready for our salad.

Along with these, one of the brightest stars of the season: taut sweet apple slices, gorgeous in colour and taste and in perfect harmony with one last, very necessary component: a sweet and fragrant vinaigrette, made with extra virgin olive oil, sage and (my favourite part and ideal to lead us gently into the new season) homemade fig jam. I have a feeling you’ll like this one a lot and be making it time and time again. Make sure you double the sweet and spicy seed & pine nut quantity - they are delicious and would be a treat for other salads, soups and pasta dishes alike.

kale_apple_salad

Kale, apple & spicy seed autumn salad

WHAT

200g kale, washed and patted dry, stalks removed

2 tablespoons pumpkin seeds

2 tablespoons sunflower seeds

2 tablespoons pine nuts

a good drizzle of olive oil 

1/2 tablespoon honey

1/2 teaspoon chilli flakes

a pinch of sea salt flakes

10 shallots, peeled

1 large red apple, cored & thinly sliced

Vinaigrette:

1/3 cup olive oil

1 sage sprig

juice from 1 small orange & 1/2 lemon

1 tablespoon fig jam

a good pinch of sea salt flakes

HOW

  1. Preheat the oven to 170C (150 FAN) and line a baking sheet with parchment paper.

  2. Toss the seeds with the olive oil, honey, chilli & salt and spread on the baking sheet. Halve the shallots and add them to the pan as well.

  3. Bake for 10-15’ until the seeds are crunchy and the shallots soft. Set aside while making the vinaigrette 

  4. Warm the olive oil & sage over medium/ high, until the oil starts to hiss- about 5’. Remove and allow to cool for a few minutes.

  5. Add the citrus juices, jam and pinch of salt to the pan with the (now slightly cooled) oil and stir with a whisk to smooth out.

  6. Massage the kale leaves gently with some olive oil & put on a platter.

  7. Slice the apple and add to the kale, along with the seeds. Drizzle with the vinaigrette, toss gently and serve.

kale_apple_salad

Roasted Red Peppers Stuffed with Orzo Salad

These delicious roasted red bell peppers are filled with an orzo salad of olives, capers and lots of fresh herbs; they are the ideal end of summer / beginning of fall dish. 

Roasted Red Peppers Stuffed with Orzo Salad

One of my favourite dishes (and certainly my favourite summer dish) is gemista, chubby tomatoes & bell peppers stuffed with rice (or bulgur) and herbs and baked until soft, bubbly and delicious. It really is a quintessential Greek summer dish and though I never tire of it, this time I combined it with another favourite of mine, orzo. Tough very often used in Greek cooking, orzo seems widely overlooked elsewhere. It is a delicious minuscule pasta, which tastes delicious both straight of the oven and at room temperature. It’s also great tossed with vegetables, which is why I’ve decided to stuff my peppers with a very summery orzo pasta salad: juicy cherry tomatoes, which I’m never without in the summer months, red onion, lots of herbs, and a few of my favourite Oliveology products: black Kalamata olives and artichokes, all dressed in white balsamic vinegar and extra virgin olive oil, and finished off with homemade golden oregano breadcrumbs.

Roasted Red Peppers Stuffed with Orzo Salad

Roasted Red Peppers Stuffed with Orzo Salad

WHAT

4 red bell peppers, halved, seeds discarded

4 garlic cloves (skin on)

1 cup uncooked orzo

1 small red onion, diced

about 15 cherry tomatoes, halved or quartered, depending on their size

1/2 bunch of dill, roughly chopped 

1/2 bunch of mint roughly chopped 

2 tbsp capers

1/2 cup Kalamata Olives

1/2 cup jared artichokes, whole or roughly chopped

3 tablespoons extra virgin olive oil

2 tablespoons while balsamic vinegar

freshly ground black pepper to taste

1/4 cup aged feta, crumbled

sea salt flakes (optional)

Homemade breadcrumbs:

3 slices stale bread

1/2-1 teaspoon dried oregano

zest from 1/2 lemon

a good drizzle of extra virgin olive oil

big pinch of salt 

HOW

  • For the breadcrumbs: Put the bread in a food processor & pulse until you have thick breadcrumbs; toss with the oregano and lemon zest and add to a hot pan, along with a good drizzle of olive oil. Cook over medium heat for about 7’, or until golden. Remove from the heat, add a good pinch of sea salt flakes and set aside until ready to use. (You can store any leftovers in a jar for up to a week). 

  • Preheat the oven to 200C (180 Fan); place the peppers & garlic on a baking tray, drizzle with some olive oil, add a good pinch of salt and bake for about 20’ or until soft, but still holding their shape. 

  • Meanwhile, cook the orzo in plenty of salted water for about 10’, drain well and add about a tablespoon of olive oil; set aside to cool a little and then toss with the onion, tomatoes, herbs, capers, olives, artichokes, extra virgin olive oil, balsamic and black pepper. 

  • Take the peppers out of the oven and squeeze the garlic cloves off their skin; add to the orzo and toss again gently. Taste and scoop into the halved peppers, finishing off with feta crumbles, a light drizzle of olive oil and a good sprinkle of the breadcrumbs. 

Roasted Red Peppers Stuffed with Orzo Salad

For all the delicious Oliveology ingredients I used, have a look here. They really do make the dish sing!

Lazy courgette pie (mamaliga)

This lazy courgette pie (mamaliga) couldn't be easier to make or more delicious. Enjoy it warm, at room temperature or even straight from the fridge and I promise you, it will become on of your go-to in no time.

mamaliga

I’ve always been quite vocal about my love of pies, especially those from back home. This courgette one though took a while to get my love. Though it’s been a staple in my mom’s repertoire for years, I was more partial to thicker, more layered versions to pay it much notice. How wrong have I been! Mamaliga truly is one of the easiest, least laborious and definitely most delicious pies you’ll come across.

Fresh, because of all the grated courgettes (which you can substitute for squash and/ or pumpkin in the cold months) and heaps of dill, salty and earthy thanks to lots of crumbled feta and perfectly crispy, as you’ll bake it as a thin layer, it will become a favourite almost instantly- I hope!

For a how-to video, head here; and for the recipe, have a look further down.

mamaliga
mamaliga
mamaliga

Lazy courgette pie (mamaliga)

WHAT

3 medium courgettes (about 500g), grated

1/2 cup Greek yogurt

1/3 cup olive oil

200g feta, crumbled

3 spring onions, thinly sliced

1 small bunch dill, roughly chopped

3 medium eggs, beaten

1 cup all purpose flour

lots of freshly ground black pepper

polenta (coarsely ground cornmeal) for the pan

additional feta crumbles & extra virgin olive oil, to finish

HOW

Preheat the oven to 180C (160C FAN). 

Combine the grated courgettes with the rest of the ingredients (reserving some of the feta) and toss well to combine the consistency should be quite loose (falling from the spoon), so adjust the amount of flour if needed.

Oil a shallow pan (I used a 25cm round tart pan) and sprinkle some cornmeal, which will add some delicious crunch to the pie.

Pour in the pie mixture and flatten with the back of a spoon; add the remaining feta crumbles and a good drizzle of olive oil and bake for about 40-45’, or until golden and set.

Let it cool to room temperature (though you can also eat warm or cold) and serve with a simple green salad, some additional yogurt or soft cream cheese. 

Sweet potato & carrot soup with goat cheese pesto

A warming and indulgent sweet potato & carrot soup with goat cheese pesto, served with thick yogurt & lots of fresh basil. Perfect for cold days & hungry tummies.

Sweet potato & carrot soup with goat cheese pesto

All hail soup, the queen of winter feasts and humble meals alike. Comforting, filled with flavour and gifting us with much more than a bowl of goodness. With just a little prep and a couple additional steps, soup can be transformed from average to a true gift, both for tummy and the soul.

I grew up eating all sorts of soups, which my mom made regularly, changing flavour profiles based mostly on what she craved and always taking lead by the best seasonal ingredients she’d find at the farmers market: some were velvety and finished off with too much freshly ground black pepper, others chunky, offering delicious vegetable or fish pieces (and less often meat) in abundance. Most of the time they included some potatoes for thickening and always lots of spices and herbs for extra flavour.

This one starts off in the oven, where sweet potatoes, carrots and onions are first baked with lots of spices, a generous glug of olive oil, a touch of honey and some seasoning; then on to the pot they go, with some delicious stock, and cooked until very very soft. And to finish things of nicely, you can make a fragrant salty pesto, to balance out the sweetness of the vegetables. The one I added here is made with crumbly goat cheese in the place of parmesan and really is delicious. You can leave it out, if you want, but it really adds depth and compliments the soup, alongside some thick Greek yogurt

sweet potato & carrot soup with goat cheese pesto

Sweet potato & carrot soup with goat cheese pesto

WHAT

2 large carrots, peeled & sliced

2 large sweet potatoes, peeled & sliced

2 red onions, skins removed & cut in thick slices

4 garlic cloves, skin removed

a good drizzle of olive oil

1 1/2 teaspoons honey

1 teaspoon ground smoked paprika

1 teaspoon ground cumin

1 teaspoon ground coriander

freshly ground black pepper & sea salt to taste

for the pesto:

40g fresh basil leaves

25g blanched almonds

80g crumbly goat cheese

1 garlic clove, skin removed

100ml extra virgin olive oil

to serve:

big dollops of full fat Greek yogurt

basil leaves

HOW

  1. Preheat the oven to 180ºC (160ºC FAN); toss the vegetables with olive oil, honey, spices and seasoning and arrange in a single layer on a baking tray; roast for about 15’, or until quite soft.

  2. Remove from the oven and put in a large pot, along with enough vegetable stock to cover the vegetables.

  3. Bring to a boil and then simmer on low heat for 15’-20’, until the vegetables are almost melting.

  4. Meanwhile, prepare the pesto, by placing all the ingredients in a food processor, adding the olive oil last, gradually, until very smooth.

  5. When the vegetables are ready, remove the pot from the heat and blend using a hand blender, or in a glass blender.

  6. Spoon into soup bowls and garnish each with a couple teaspoons of the pesto, a dollop of yogurt and some fresh basil leaves.

sweet potato & carrot soup with goat cheese pesto


Brussels sprouts, pear & spinach salad with feta & croutons

Brussels sprouts, pear & spinach salad with feta & croutons- aka my new favourite way to pack tons of vegetables and colours onto one dish.

Brussels sprout, pear & spinach salad with feta & croutons

As it always happened, when there’s emotional and mental turbulence around here, I turn to cooking, even more than usual. Unlike other times though, there has not been much baking involved. That partly has to do with the fact that my sweet tooth has been dormant for quite a while now. It’s also because I’ve been more than ever drawn to dishes which are utterly simple, rustic and largely based on their ingredients rather than a specific recipe or cooking method. And this salad is a pretty good example.

It started with Brussels sprouts and kinda took a path of its own, taking along with it bits and bobs I already had in hand: fresh spinach, a red onion, pumpkin seeds, a couple juicy pears and feta crumbles for balance. I tossed with some extra virgin olive oil and a drizzle of sweet balsamic, threw in some barley rusks for crunchiness and had this for both lunch and dinner. It was delicious- even more so, because it was so simple and came together like a little dance you’d do with when your favourite song comes up on the radio.

Brussels sprouts, pear & spinach salad with feta & croutons

Brussels sprouts, pear & spinach salad with feta & croutons

WHAT

300g Brussels sprouts, washed and halved 

1 large red onions, cut into wedges

4 small garlic cloves

2-3 sage sprigs

2 tablespoons extra virgin olive oil

sa salt flakes and freshly ground black pepper, to taste

100g baby spinach leaves, washed

80g feta, crumbled

6 barley rusks, broken into smaller pieces (you can find them here) (or about a cup large croutons)

dressing:

3 tablespoons extra virgin olive oil

1 tablespoon white balsamic

a good pinch of sea salt flakes

to serve:

2 blush pears, washed and thinly sliced

2 tablespoons pumpkin seeds

HOW

  1. Preheat the oven to 190ºC (170ºC FAN); place the Brussels sprouts, onion, garlic cloves and sage on a baking pan.

  2. Drizzle with the olive oil, season with salt and black pepper and bake for about 20′, until softened and lightly charred.

  3. Remove from the oven and let cool to room temperature.

  4. Add the spinach, feta, barley pieces and dressing and toss lightly.

  5. Divide into plates and serve each with a few pear slices and pumpkin seeds.

Brussels sprouts, pear & spinach salad with feta & croutons

Dried & fresh mushroom tagliatelle with white wine

These dried & fresh mushroom tagliatelle with white wine are exactly what a plate of pasta should be: simple, delicious and good enough to go for seconds.

dried & fresh mushroom tagliatelle with white wine

Dried mushrooms are by far one of my favourite ingredients to use; I do so sparingly though, keeping the precious dark gems at the back of my cupboard, waiting for the right moment to soak some of them in water, toss with few other ingredients and marvel once again at their rich, deep flavour and power to transform any dish into something wonderful.

Interestingly though, fresh mushrooms are neither often found in the dishes I make; I don’t dislike them, but I usually forget about them. Still, cooked in olive oil or butter and served on a couple charred slices of bread, along with fresh herbs and maybe some nuts is always a winner and, having this in mind and the dried ones in the cupboard, I did what I usually do: go for favourite flavours, chasing memories, making do with beloved ingredients, some used often, others appearing once in a while, like old friends.

All these, more often than not result in what I never tire of cooking or eating: a big bowl of pasta. Al dente noodles, tossed with a creamy sauce made of few things lovingly tossed together, each flavour shinning on its own and all together making each bite a glorious one. Fresh and dried mushrooms, cooked in golden olive oil, with lots of garlic and a good splash of white wine and finished off with fresh parsley and a little parmesan. You really can’t go wrong with this. Use the best you can get your hands one- good pasta cooked in plenty of salted water, a variety of mushrooms if you can find them and a nice, not too fruity wine. Toss well and eat while hot. Heaven.

Dried & fresh mushroom tagliatelle with white wine

5D3_2530-2.jpg

WHAT

15 dried wild mushrooms, soaked in 150ml water

4 tablespoons extra virgin olive oil

2 garlic cloves, thinly sliced

200g chestnut mushrooms, scrubbed and thinly sliced

100ml dry white wine

salt & pepper to taste

300g dried tagliatelle

1 big handful fresh parsley, minced

to serve: parmesan cheese, extra parsley

HOW

  1. Soak the dried mushrooms in the hot water for 15′. Drain, keep the water and slice the mushrooms thinly.

  2. Warm the olive oil in a large pan and add the garlic; cook for about 5′. Add the fresh & dried mushrooms and cook for about 10′. Add the wine and when it is evaporated, add the mushroom water (through a sieve, to catch any grit) and simmer over a low heat.

  3. Meanwhile, cook the tagliatelle in a big pot of well salted boiling water until al dente, according to pack instructions. A little before the pasta is ready, reserve about 1/2 cup of the water, add to the mushrooms and cook for another 5′ or so.

  4. Drain the pasta and add it to the pan. Toss quickly to combine and lastly season with salt and pepper and add the fresh parsley.

  5. Divide into warm plates and serve with grated parmesan and extra parsley, if desired.

dried & fresh mushroom tagliatelle with white wine

Cinnamon & lemon mini apple pies

Fall & winter baking can’t get any easier than these cinnamon & lemon mini apple pies with they buttery, fragrant filling and crunchy sweet crust.

5D3_9979.jpg

Fall is probably my favourite time to bake; after a long summer, which is mostly spent devouring fresh vegetables and fruit, merely tossed with some extra virgin olive oil, fragrant herbs and crunchy nuts, when the days get darker and shorter, I truly crave time spent around the stove. And apples and pears, along with beautiful thick-skinned vegetables, provide just the right starting point for that.

Apples especially never cease to amaze me, with their endless variety, different colours and versatility in the ways they can be cooked: in my favourite autumnal cake, paired with brown butter and hazelnuts; made into a jam, along with chubby, sour blackberries and lemon juice; and of course, you certainly must use them in a pie, buttery and crumbly on the outside, with beautifully juicy filling. Apples also love cheese: they are always my go-to when assembling cheese platters for those first post- summer gatherings and they are a delight paired with sharp cheddar and saffron; combined with stilton and sage for an intensely flavoured, thick soup is also ideal for warming lunches and quick dinners.

Still, out of all the ways one can enjoy an apple, two are my most favourite: taking a big bite out of one, juices running down my chin and turning them into a pie. These cinnamon & lemon ones are a child’s play to put together, yet punch so much flavour- I hope you give them a try and enjoy them time and time again, using different varieties of beautiful apples.

Cinnamon & lemon mini apple pies

5D3_9977.jpg

WHAT

3 small/ 2 medium apples, peeled, cored & cubed (you can use any variety you like- just make sure you add a little extra honey if the apples are quite tart)

20g unsalted butter

zest of one lemon and a squeeze of its juice

30g honey (about a tablespoon)

1/2 teaspoon ground cinnamon

1/4 teaspoon ground cardamom

1 sheet of butter puff pastry, thawed but cold

1 egg, beaten with 1 tablespoon water

2 tablespoons temerara sugar

HOW

  1. Put the cubed apples, butter, lemon zest & juice and spices in a small pan over a medium/ low heat; cook until the butter is melted and the fruit soften, about 8′. Remove from the heat and set aside.

  2. Roll out the puff pastry and cut into six squares; place about 1/2 tablespoon of the filling onto the centre of each square and wet the edges with a touch of water, using your fingers.

  3. Bring one corner of the square over to the opposite side and press to seal with a fork. Repeat with the other squares.

  4. Carefully place the pies on a baking sheet lined with parchment and put in the fridge for about 20′, allowing the pastry to firm up again; preheat the oven to 200ºC (180ºC FAN).

  5. Remove the pies from the fridge, brush with the egg wash and sprinkle generously with demerara sugar.

  6. Bake in the preheated oven for 20′, or until they are puffed and golden.

  7. Remove from the oven, allow them to sit for about 5′ and serve warm or at room temperature, maybe with a dusting of icing sugar.

5D3_9978.jpg

Baked chickpeas with capers, olives & orange

These simple and delicious baked chickpeas with capers, olives & orange only need friends to share with and lots of crusty bread.

Baked chickpeas with capers, olives & orange

Of all pulses, chickpeas are easily my favourite. Their smooth taste makes them irresistibly versatile and a great addition to so many dishes- from silky hummus and veggie burgers to chunky soups and fragrant curries. Possibly my favourite way to cook them has been tossing them with olive oil, lots of spices and herbs and cook until very crispy and utterly irresistible. Like so, they add texture and lots of flavour to fried eggs and veggie wraps- though to be honest, I mostly just eat them straight from the pan, while they are still almost too hot to touch.

This dish was largely inspired by a chickpea stew my mom often makes- I’ve had it way too many times as a teenager, always nagged about it, but still devoured it every time and asked for seconds too.

You can’t wrong with these baked chickpeas and you can probably get away with not measuring pretty much anything to be honest. Use very good quality olive oil and dried herbs and choose olives with the pit on (always!) and preferably capers from a good deli, so they are not small, too sour and kind of flavourless* – the whole dish depends on these few ingredinets, so use the best you can get. Other than that, it’s such a rustic, easy and humble dish, which is what I so love about it. It’s possibly my favourite way to cook, especially for others, as both the process and the end result are utterly satisfying, relaxed and unpretentious. And of course you can never go wrong with a dish that requires lots of crusty bread to scoop up juices with.

* I always buy olives and capers (among other things) from Oliveology, as they are truly delicious and sourced from independent farmers from all over Greece.

Baked chickpeas with capers, olives & orange

Baked chickpeas with capers, olives & orange

WHAT

1 large orange, washed and sliced thickly

2 cans chickpeas, rinsed

15 small black olives

1 1/2 tablespoons capers (try one, you may need to rinse them)

4 medium garlic cloves, skin on

1 teaspoon dried oregano

1 teaspoon sumac

scant 1/2 teaspoon chilli flakes (optional; if you do without, add plenty of freshly ground black pepper)

1/2 tablespoon honey

175 ml good olive oil

sea salt

HOW

  1. Preheat the oven to 190ºC (170ºC FAN).

  2. Arrange half the orange slices on the bottom of a baking dish.

  3. Combine the chickpeas, olives, capers, garlic cloves, oregano, sumac and chilli flakes (if using) in a small bowl. Pour the honey and olive oil and toss well to combine. Add salt (and pepper), toss well, taste and adjust if necessary.

  4. Spoon over the orange slices and top with the remaining slices.

  5. Cover loosely with foil and cook in the preheated oven for 30’. Remove the foil and cook for further 5’.

  6. Remove from the oven and serve (hot or warm) with lots of crusty bread.

Baked chickpeas with capers, olives & orange

Mandarine, beet & pistachio barley salad

Colourful and filled with flavour and textures, this mandarine, beet & pistachio barley salad is a super star all around.

Mandarine, beet & pistachio barley salad

It’s not always clear to me how a recipe comes together; often it’s something I crave or miss- usually my mom’s food or a dish I’ve tried in a restaurant and left a lingering taste in my mouth. Other times inspiration stems from recipes seen in cookbooks or online. More often than not though, everything starts with ingredients: it can be something not very exciting I have in the fridge or cupboard, or fresh seasonal produce first making a timid appearance in market stalls. These are my favourite ones: I feel almost haunted by colours and shapes, I touch and smell- and slowly a dish, or a faint outline, more like a desire, starts coming together. For this salad, it all started with mandarines- of which I used to not think much  for quite a long time. Then suddenly, a while ago, I started finding them utterly irresistible. I love when that happens- it’s like having a new friend and start making all sorts of exciting plans for adventures to share together.

This fall, ever since I laid eyes on the first mandarines of the season, they became a staple: I’d have them for breakfast, snack or lunch, on their own or alongside thick yogurt, crunchy nuts of even dark chocolate. And soon enough they made an appearance in savoury dishes too. I can’t decide what I love most about them- their gorgeous colour and sweet acidity, soft flesh or how beautifully they pair with all sorts of ingredients, from fresh leaves to salty cheese and root vegetables. And speaking of gorgeous colours, they’re in such great company with the deep hues of earthy beets and striking baby spinach.

So a salad was in order, one of my favourite dishes to make. Fresh and filling, put together in such an uncomplicated way, yet yielding such a beautiful sight and inviting taste. Made with lots of vegetables, cooked barley (though faro would also be a great alternative), a bright and slightly sweet vinaigrette and finished of in the way I usually prefer: crunchy nuts and a good cheese.

Mandarine, beet & pistachio barley salad

WHAT

200g cooked pearl barley*

4 mandarines, thinly sliced

2 medium-sized beets, cooked, thinly sliced**

for the dressing:

juice of 1 mandarine

3 tablespoons extra virgin olive oil

1 teaspoon honey

sea salt flakes & freshly ground black pepper to taste

to serve:

2 tablespoons pistachios, shelled and roughly chopped

parmesan flakes, to taste

WHAT

  1. Make the dressing by combining all the ingredients; taste and adjust accordingly- taste your fruit, if it’s too sweet, you may need less honey or an additional pinch of salt.

  2. Place the cooked barley on a serving platter and add the sliced mandarines, beets and spinach leaves. Add the vinaigrette and toss lightly.

  3. Before serving, top with the chopped pistachios and parmesan flakes.

* To cook, combine the barley with 3 cups water in a saucepan, along with a good pinch of salt and bring to a boil; reduce the heat to a low simmer and cook for about 25′- it will almost triple in volume and will become soft, but still holding a bite. Drain if necessary and let cool before using in the salad.

** You can use pre-cooked beets (just make sure they are not cooked in vinegar), or scrub fresh ones clean, wrap them in foil and cook them in a preheated oven (200°C, 1800°C FAN) for about 40′ to an hour. To make sure they are done, poke them with a fork- you should be able to insert it easily. Remove from the oven, unwrap and let them cool.

Mandarine, beet & pistachio barley salad

Nutty & crunchy baklava

One of my all time favourite desserts, this nutty & crunchy baklava may take a while to prepare, but it’s sure to make your heart beat a little faster.

5D3_7820-2.jpg

Baklava was the first dessert I shared, back when I was experimenting with almost every sweet recipe under the sun: from chocolate chip cookies and spicy buns, to seasonal cakes and fluffy muffins, I did not discriminate, I was game for it all. I had an impossible sweet tooth and was eager to try everything- both in terms of cooking and shooting alike. And, as it often happens, most of my shots and culinary efforts were all over the map. Yet, I remember that time so fondly and with some nostalgia- finding one’s voice, discovering likes and dislikes is usually not an easy process and for me, it was both very frustrating and utterly enjoyable.

I still like cookies, muffins and cakes, but my sweet cravings are now more likely to be satisfied with a couple juicy dates or a few chunks of dark chocolate with sea salt flakes. And as time went by, I realised that the dishes that made me most happy to cook, shoot and eat were the ones that were somehow connected to the food I grew up with. Hence this revisited baklava: thought it is very sweet, it still is one of my favourite things to make and serve. I love the many steps in requires- playing with filo pastry is always a treat and the flavours never cease to bring back so many memories.

This version is the one closer to my heart- and tastebuds. Each piece is bursting with crunchy nuts and the syrup here is minimal- almost just enough to gently embrace all the crunchy goodness both inside and outside. You may want to double it if you prefer a more syrupy baklava, or leave as is for extra crunchiness and a somewhat lighter taste. I hope you enjoy both the process and the dessert itself- it is made to be shared and, like most things, tastes even better like so.

Nutty & crunchy baklava

Nutty & crunchy baklava

WHAT

for the syrup:

200g caster sugar

150ml water

3 tablespoons honey

1 orange, quartered

for the baklava:

300g unsalted butter, melted

400g nuts (I used primarily pistachios and some almonds & pecans)

1 1/2 teaspoons ground cinnamon

1 teaspoon ground cloves

450g filo pastry, thawed

to serve: additional nuts, very finely chopped (optional)

HOW

  1. Start by making the syrup, so it’s cold by the time the baklava comes out of the oven: place the sugar, water, honey and orange wedges in a saucepan and bring to a boil. Simmer for a couple of minutes, until the sugar is dissolved, and remove from the heat. Set aside to cool completely.

  2. Preheat the oven to 170ºC (150ºC FAN); place the nuts on a baking tray and in the oven for about 5′, allowing them to release their aroma. Set aside to cool slightly and chop finely (but not into a powder). Combine with the spices and set aside.

  3. Have your melted butter ready on one side and your filo covered with a dump tea towel (to prevent it from becoming dry) so you can easily and quickly assemble your baklava.

  4. Using a brush, generously butter the bottom of a round pan. Layer your first piece of filo and drizzle it with some butter using the brush (don’t brush directly on the filo, as it will weight it down). Continue with 5 more pieces of filo, rotating them so they hang evenly over the pan.

  5. Add half of the nuts in a single layer and cover with 3 more pieces of filo, buttering each as you go.

  6. Add the remaining nuts and top with the last 6 filo pieces, again buttering each as you go.

  7. Place in the fridge for about 10′ so it is easier to cut. Just before putting the baklava in the oven, cut it diagonally- don’t cut all the way, just firmly trace it, so it’s easier to cut into pieces after it’s baked.

  8. Place in the oven for about 2 hours- or until the top is golden brown.

  9. Remove from the oven and ladle the syrup on top.

  10. Allow it to cool completely and serve sprinkled with additional nuts if desired.

5D3_7808-3.jpg

Super green avocado, kale & ginger smoothie

Rise and shine! A super pretty, super tasty, super green avocado, kale & ginger smoothie with chia seeds and fragrant lime.

Super green avocado, kale & ginger smoothie

In the winter, when early morning are usually dark, quiet and cold, I long for comforting, warming oats with stewed fruit, nut butters and fragrant spices; or hearty, saucy eggs served with thickly sliced bread. And then, there are also those days when all I crave are bright smoothies, filled with all the goodness and freshness, served in big round glasses. Sometimes they are dark pink or pale yellow, most often though they are green: pale and smooth or deep emerald, thick and frothy.

I change the fruit and vegetables depending on what’s available and what I feel like, but almost always, there’s some ginger and kale in there. I always have both in hand, as I love ginger’s peppery taste and intense aroma and kale’s dark green colour, slightly bitter taste and lovely texture.  This super green, super tasty version was concocted with the help of my sister, using some of our favourite beauties: kale and ginger of course, buttery soft avocado, a crunchy red apple , an almost black banana for sweetness,  a good squeeze or fragrant lime (I go through periods of utter obsession with lime, much like with other things, but citruses have a tendency to constantly make me swoon) and a sprinkle of chia seeds.

Blend blend blend with water, serve and drink immediately, preferably standing in a dim kitchen, watching the morning light grow a little stronger minute by the minute- I swear this smoothie makes everything just a little brighter.

Super green avocado, kale & ginger smoothie

Super green avocado, kale & ginger smoothie

WHAT (serves 2)

1/2 ripe avocado

1 ripe banana

1 red apple, washed, cored & cubed

60g kale, washed, chopped, hard stems removed

10g ginger (1 thumb), peeled & roughly chopped

1 1/2 teaspoons chia seeds

juice from 1/2 lim

3 cups water

HOW

  1. Place everything in a blender and whizz until smooth.

  2. Pour into two large glasses and drink up.

Super green avocado, kale & ginger smoothie

Vegan baked feta with olives & thyme

Two of my favourite ingredients combined and baked to bubbly perfection. We’re gonna need a bigger loaf of bread for this one.

Vegan baked feta with olives & thyme

I am not a very adventurous person in general, but when it comes to food and a few other things, I love to give in, try new things and be completely open. Still, inevitably, there are patterns and preferences and every once in a while, I like to deviate from them and just see what happens. And though my diet is mostly vegetarian, with lots of eggs and some fish and a little chicken on the side, going vegan every year for about a month (around Easter time) really does make me so much more inventive and playful in the kitchen. I rely heavily on spices and herbs, more than I usually do, fall in and out of love with pulses and satisfy my minor sweet tooth with sliced pineapple and papaya, baked with vanilla beans and pure maple syrup. Last but not least, this year I discovered (and may have also become addicted to) the bliss of vegan feta.

Let me explain: in Greece, cooked pulses are often eaten with a generous side of feta cheese and, as I’ve been eating chickpeas and beans in almost every way possible, I realised that what I was probably missing the most was feta. And then I found it: mildly flavoured, made of coconut, reminding me of another favourite Greek cheese (the name escapes me). And then I wish I hadn’t, since I literally could not stop eating it: for breakfast, over crunchy toast, with a pinch of sumac and a drizzle of olive oil, accompanying baked chickpeas for lunch, tossed with juicy tomatoes and buttery avocados for dinner- you name it, I’ve probably had it with some vegan feta.

Today’s dish is probably my favourite way to enjoy it- and almost definitely the last time I’ll have it for a while: combined with chubby black and green olives (pits on, always!), lots of good olive oil, orange juice and zest, chipotle flakes, bay leaves and fresh thyme. Put it in the oven for merely 15 minutes and brace yourselves for melted, bubbly heaven. And for the love of all things delicious, don’t forget the bread!

Vegan baked feta with olives & thyme

Vegan baked feta with olives & thyme

WHAT

200g vegan feta (I used this one)

about 3/4 cup black and green olives

130 ml extra virgin olive oil

juice & zest from 1/2 orange

1/4 teaspoon chipotle flakes

3 small bay leaves

3 fresh thyme sprigs

4 small garlic cloves, skin on

a pinch of sea salt flakes (taste your olives first and season accordingly)

HOW

Preheat the oven to 180ºC (160ºC FAN).

Place the feta in a deep-ish baking dish and arrange the olives around it.

Add the olive oil, juice & zest, sprinkle with the chipotle flakes and then add the bay leaves & thyme sprigs.

Season and bake in the preheated oven for about 15′, or until the “cheese” is bubbly.

Remove from the oven, let it sit for about 5′ and serve immediately either from the baking dish or after transferring it (carefully! Vegan feta melts quicker and more than the real thing, so try to transfer it whole as much as possible) on a serving dish. And, again, don’t forget the bread!

Vegan baked feta with olives & thyme

Earl Grey breakfast quinoa with tahini & jam

A delicious, warming and filling Earl Grey breakfast quinoa with tahini & jam for those sunny yet cold last days of winter.

Earl Grey breakfast quinoa with tahini & jam

The last few days have been somewhat hard, somewhat dragging more than I would have liked. I love winter- and even when I don’t, I’ve learned to at least (pretend to) keep my cool and tolerate it as best as I can. Yet these last weeks before the official arrival of spring almost always get me. Temperatures are still low and the days are still a little gloomy, a little dark, with the occasional deceiving blasts of sunlight, which only intensify the longing for spring. And early mornings, dark and quiet, that’s when I may get blue the most. And yet, those are the best promise for the day about to start. And mine almost always starts with a great breakfast.

By great, I don’t necessarily meet grand. I mean simple and quick and often messy and always filling. That’s what a great breakfast is, isn’t it? One that fills the tummy, wakens the mind and fortifies the spirit. If I can have my way (and I usually do), such a great meal will consist of many colours and textures and finely balance between the savoury and the sweet. It will be interesting enough to set the tone for the new day, as creative as I can muster at 8am and also familiar and comforting. So it’s no surprise that my usual weekly winter breakfast is a warming plate of goodness. It may be soft scrambled eggs and ricotta or avocado over very crunchy toast or oatmeal with all the spices, seeds and nuts, topped with seasonal ripe fruit.

Lately it’s this very addictive quinoa bowl. It couldn’t be easier to make (and play around with) and more comforting as that first meal of the day. Starting with almond milk, quinoa and a bag of my beloved Earl Grey tea simmering away, while you choose the toppings du jour. You may well do without the tea, but I really think you should give it a try; it adds a fragrant almost bitterness and earthiness to the quinoa, which is perfectly balanced by the slightly savoury tahini, sweet jam and juicy fresh fruit. Add a spoonful of yogurt and a generous dusting of cinnamon and you’re good to go. There, it’s a new day and we’ve got this.

Earl Grey breakfast quinoa with tahini & jam

Earl Grey breakfast quinoa with tahini & jam

WHAT (serves 1)

60g quinoa, rinsed thoroughly

150 ml coconut milk

1 Earl Grey tea bag

1/2 teaspoon ground cinnamon 

to serve:

unsweetened yogurt, tahini, orange & blood orange slices, jam

HOW

  1. Place the rinsed quinoa, almond milk and teabag in a small sauce pan over high heat; bring to a boil and then reduce to a very low simmer.

  2. Cook for about 13′(removing the tea bag after the first 5’ and discarding)., or until the quinoa is cooked but still holds a light bite.

  3. Place the cooked quinoa in a serving bowl and top with a few tablespoons almond milk, some yogurt, tahini, jam and fresh fruit.

* Feel free to adjust/ add ingredients to your liking. The cooked quinoa is not sweet at all, so I would definitely recommend the addition of jam, honey or maple syrup.

Earl Grey breakfast quinoa with tahini & jam